
After choosing an ad idea, review the visual references and script before generating the video. You can generate a storyboard to check the planned shots, or continue without one.
1. Character & Location
Before generating storyboard panels, review the [Characters] and [Location] assets above the [Script] section. These assets give the script consistent visual references for people and settings.

Select a character or location asset to review its image, name, and prompt. You can change the name and prompt, then regenerate the character or location to update its image. Regenerate either asset when its appearance or setting does not match the ad you want to create.
You can also upload your own image for a character or location. Click the [×] in the lower-left corner of the image to remove it. The [+] appears in the same spot; click it to upload your image.
Keep product assets focused on the product. Avoid showing people or locations in product images because Characters and Location are generated at the storyboard step and provide the references for visual consistency.
2. Review and Edit the Script
In the script, use @ to reference a character or location by name. For example, write @Alex or @Minimalist desk setup in a shot description to identify who appears and where the action takes place. Check that each reference matches the intended asset before generating storyboard panels.
Read the complete script and confirm that it communicates the selected idea clearly within the video’s duration. Check product claims, prices, promotion details, names, and pronunciations rather than relying only on the imported page content.
To edit the script, click the expand-script button in the top-right corner of the script section, then revise the text. Keep each line concise and consider the duration of each shot so it does not contain too many actions. If you selected [Product with Voiceover] or [Talking Video], double-check every voiceover or UGC-style spoken line for accuracy, clarity, natural wording, and pronunciation.
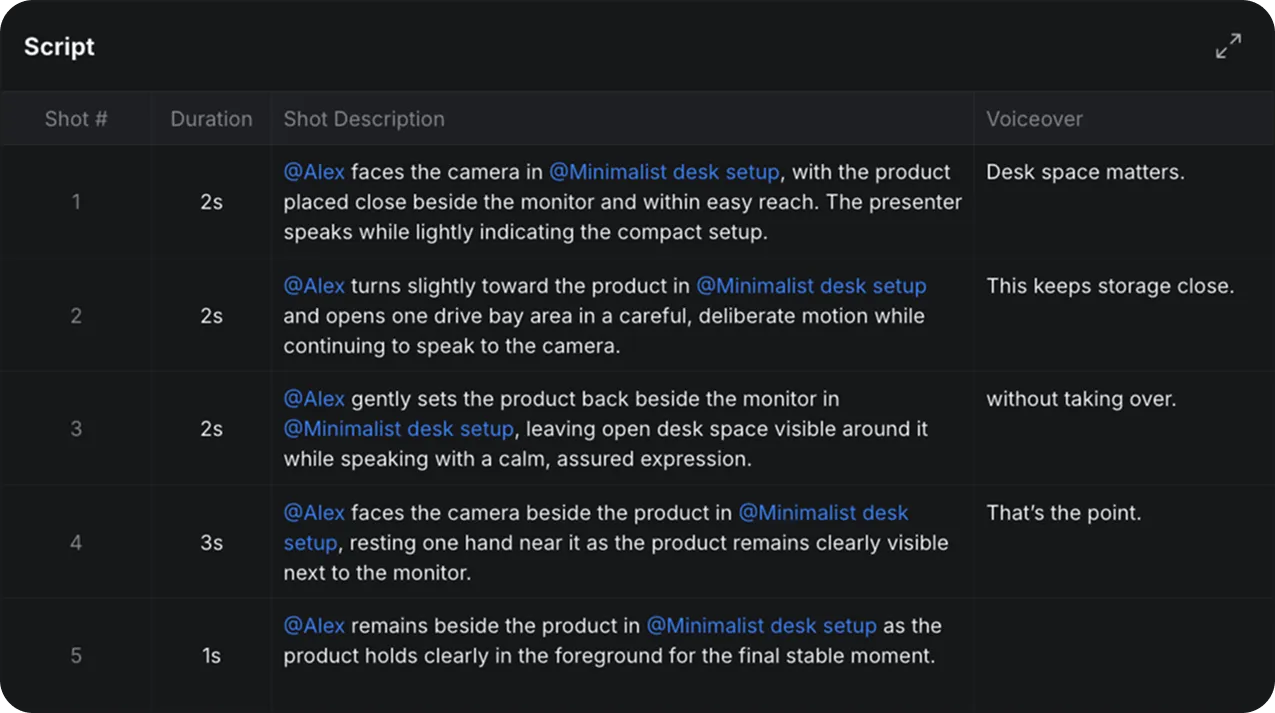
For detailed guidance on editing script fields, see Mastering Ad Scripts.
3. Generate and Review the Storyboard
After editing the script, click [Generate Hand-Drawn Storyboard] or [Generate Photo-Realistic Storyboard] (if you chose Photo-Realistic Only in the previous step). If you selected “Hand-Drawn + Photo-Realistic,” the hand-drawn storyboard appears first. Review the composition, shot order, object and camera movement, and lighting direction. Generate the photo-realistic storyboard when the plan looks right. Use the [Hand-drawn] and [Photo-Realistic] tabs to compare the available versions.
The hand-drawn storyboard may use colored arrows or lines to explain movement and lighting that a still frame cannot show:
- Blue: Camera movement.
- Red: Character or object movement.
- Yellow: Light or lighting changes.
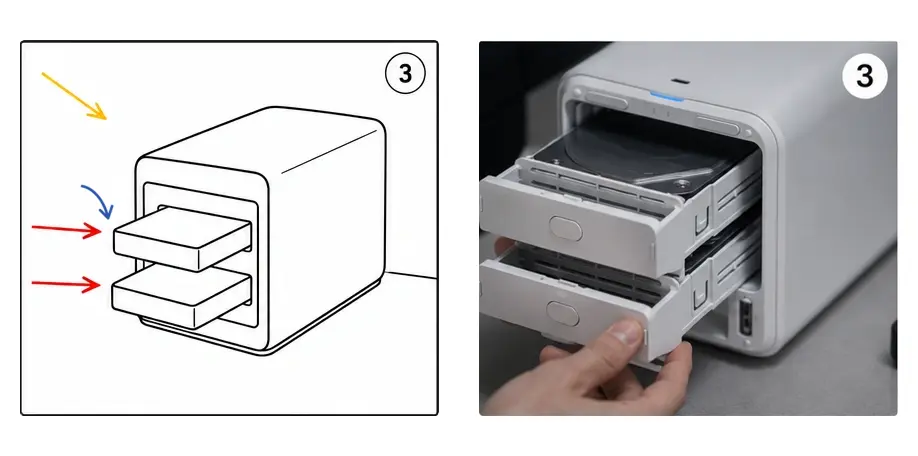
The photo-realistic storyboard helps confirm the intended appearance, composition, product presentation, and overall visual direction before video generation. If you selected “Photo-Realistic Only,” review this version directly.
Review each generated shot and confirm that its sequence supports the approved script and selected idea. Shots may last only a few seconds or even one second, so make sure the planned visuals and actions fit the available time.