
CawCut Workflows use a node-based creation system. Each node is a building block that performs one task, such as collecting product information, preparing text, generating an image, planning storyboard scenes, or creating a video. You can run a node by itself or connect several nodes to turn a creative process into a reusable Workflow.
Nodes make each stage visible and editable. Instead of repeating the entire process when you want a different result, you can change the prompt, model, reference, or output settings in the relevant node and run that part of the Workflow again.
1. Types of Nodes
Use the following guides to learn what each major node category can do and how to configure its available models and settings.
| Nodes | What It Does | Best For |
|---|---|---|
| Text Generation | Generates, rewrites, or organizes text with a language model. | Prompts, scripts, captions, and descriptions. |
| Image Generation | Generates, edits, enhances, or transforms images. | Creating new visuals or modifying existing images. |
| Storyboard Node | Plans scenes and generates coordinated storyboard images. | Multi-shot planning and establishing visual direction. |
| Video Generation | Generates video from text, images, frames, or other references. | Creating motion, animating images, and producing video clips. |
| Product Node | Collects product details and images from a product page URL. | Product descriptions, promotional visuals, and product videos. |
You can combine node categories in the same Workflow. For example, a Product node can collect product details and images, a Text node can use that information to prepare promotional copy or a visual prompt, and an Image or Video node can generate the product-related content.
2. Node Components
Although the available controls vary by node, most nodes contain the following parts:
- Node name: Identifies the node and its purpose.
- Settings: Let you choose the model and adjust options such as aspect ratio, resolution, quality, duration, or generation amount when supported.
- Inputs: Receive information such as text, images, audio, or video. You can enter the information inside the node or pass it from an upstream node when a compatible connection is available.
- Outputs: Provide the result that can be previewed, downloaded, or passed to another node.
- Run status: Shows whether the node is ready, generating, completed, or needs attention.
Not every node has the same inputs, outputs, or settings. Open the guide for the node category you are using to learn about its supported models and controls.
3. Create Nodes
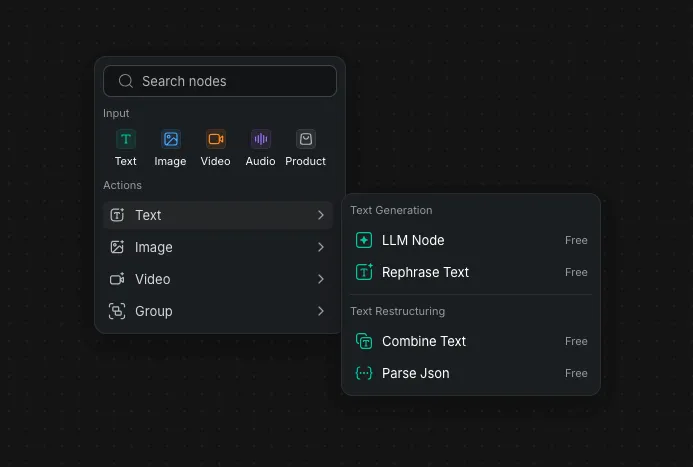
Right-click an empty area of the Workflow canvas to open the add-node menu, then select or search for the node you need.
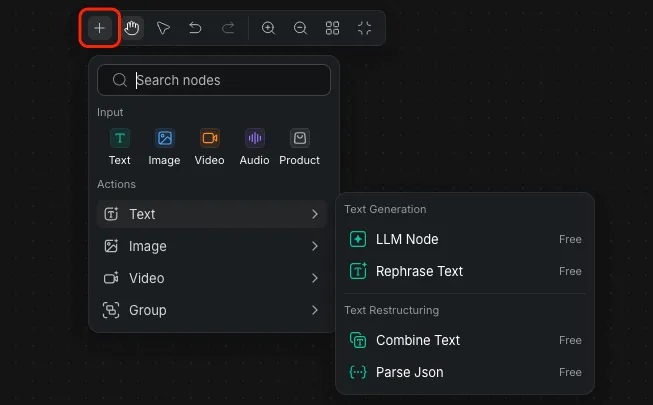
You can also select the [+] button in the top menu bar to open the same menu.
If you are uncertain which node to add, begin with the result you want to create and use the Types of Nodes table to choose the closest category.
4. Connect Nodes
Connections pass information from one node to another. Input ports on the left side of a node receive compatible data, while output ports on the right side pass results to the next node.
The output and input must support the same data type. For example, connect an image output to an input that accepts images.
For step-by-step instructions on adding nodes, creating connections, and running the completed Workflow, see Connect Nodes and Run a Workflow.
5. Build Your First Workflow
A simple creation flow can move through three stages:
- Use Text Generation to develop a visual prompt or short scene description.
- Pass the text to Image Generation to create a reference image.
- Pass the image to Video Generation to turn it into a video clip.
For a multi-scene project, use the Storyboard Node to plan the sequence and visual direction before generating the final assets.
To build a Workflow manually and learn the basic canvas controls, follow Create a Workflow. If you prefer to begin with a ready-made Workflow and customize its nodes, follow Start with a Template.
You do not need to use every stage. Start with the smallest Workflow that produces the result you need, then add or branch nodes when you want to automate more of the process, compare variations, or reuse the setup for another project.