
Use this guide when the same room, station, street, landscape, vehicle interior, or other recurring location needs to remain recognizable from one AI-generated shot to the next.
The main rules are:
- The background reference defines the location and fixed landmarks.
- The storyboard defines framing, blocking, screen direction, timing, and movement.
- Character, non-human, and vehicle references identify the recurring subjects.
The storyboard should remain intentionally simple. It plans the sequence without trying to reproduce final faces, clothing, fur, materials, lighting, or finished environment artwork.
1. Separate Location Appearance From Shot Planning
Use a different asset for each type of scene information:
| Asset | What it controls |
|---|---|
| Background reference | Location layout, architecture, landmarks, materials, lighting, weather, and color palette |
| Simple storyboard sketch | Shot size, pose, blocking, screen direction, human movement, non-human movement, vehicle movement, and camera movement |
| Character, non-human, and vehicle references | The approved appearance of people, animals, creatures, props, and vehicles |
2. Build a Reference Sheet for Each Location
Create an approved environment sheet for each distinct location design with the Image Generation node. This gives the Storyboard Node one clear source for architecture, layout, landmarks, materials, and lighting.
A useful background reference should clearly show:
- The overall layout and camera-facing orientation.
- Doors, stairs, pillars, chairs, furniture, pathways, tracks, and other fixed landmarks.
- Wall, floor, ground, ceiling, and platform materials.
- The main lighting direction and color temperature.
- Alternate angles required by the planned shots.
- A simple top-down view when the spatial relationship is important.
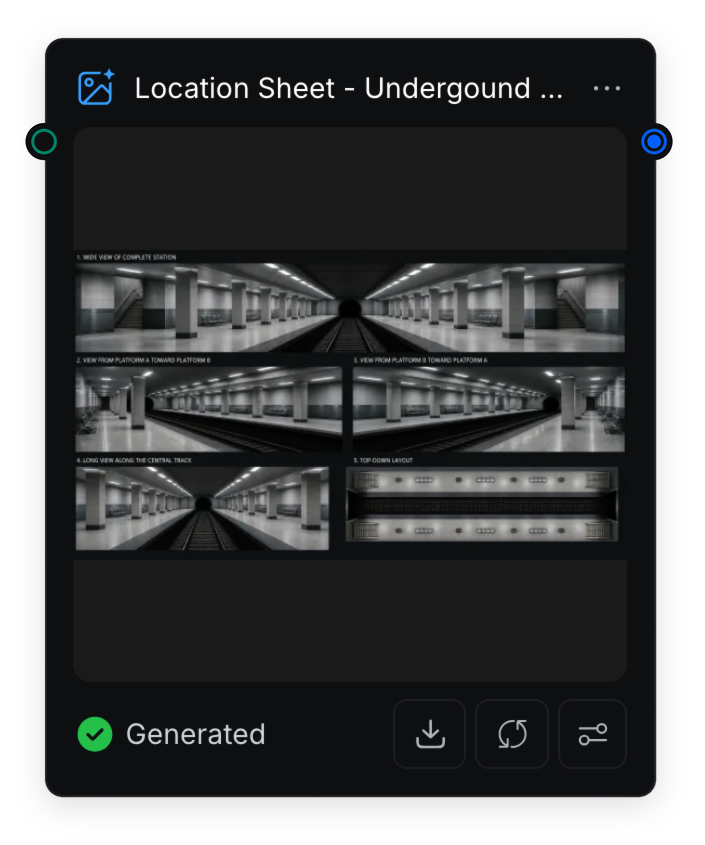
Name each story location clearly. When two separate locations share the same design, use the environment sheet as their shared design source and give each location a separate name. For example, treat Underground Station B as a separate station whose architecture is identical to Underground Station A.
A background reference defines the final location. The storyboard should show only the simplified environment lines required for blocking and composition.
3. Keep Storyboards Simple and Diagrammatic
The storyboard should remain a simple line sketch. Its purpose is to communicate the shot, not to supply finished visual details.
Use the sketch to show:
- Shot size and composition.
- Character, animal, vehicle, and object positions.
- Pose, action, expression change, and screen direction.
- Camera angle and camera movement.
- Foreground, midground, and background placement.
- Entry, exit, and repeated-action paths.
- Important story beats.
Keep the figures and environment intentionally simple:
- Draw people as faceless line figures or basic shapes.
- Draw animals and other non-human characters as simple silhouettes.
- Draw vehicles using only the major silhouette and direction.
- Use plain clothing outlines without patterns, textures, or color design.
- Use basic environment lines for stairs, pillars, chairs, tracks, walls, paths, and landmarks.
- Do not add detailed faces, hair, fur, markings, materials, lighting, or finished background art.
4. Use the Storyboard Node Only for Planning
Add a Storyboard Node to create the planning storyboard. The output should remain a simple line-and-shape diagram rather than finished or cinematic shot images.
Connect:
- The story prompt.
- The approved location references.
- The approved human, non-human, and vehicle references required by the story.
Use Connect Nodes and Run a Workflow if you need help connecting several inputs to the same node.
Start with the [System Prompt]. Use it to define the storyboard style, divide the story into shots, assign timing and camera direction, set annotation rules, and explain how the Storyboard Node should use each connected reference.
Then add the [User Prompt]. Use it only to describe the story, total duration, character and subject actions, location changes, and continuity requirements. Do not use it to divide the story into panels or assign camera shots.
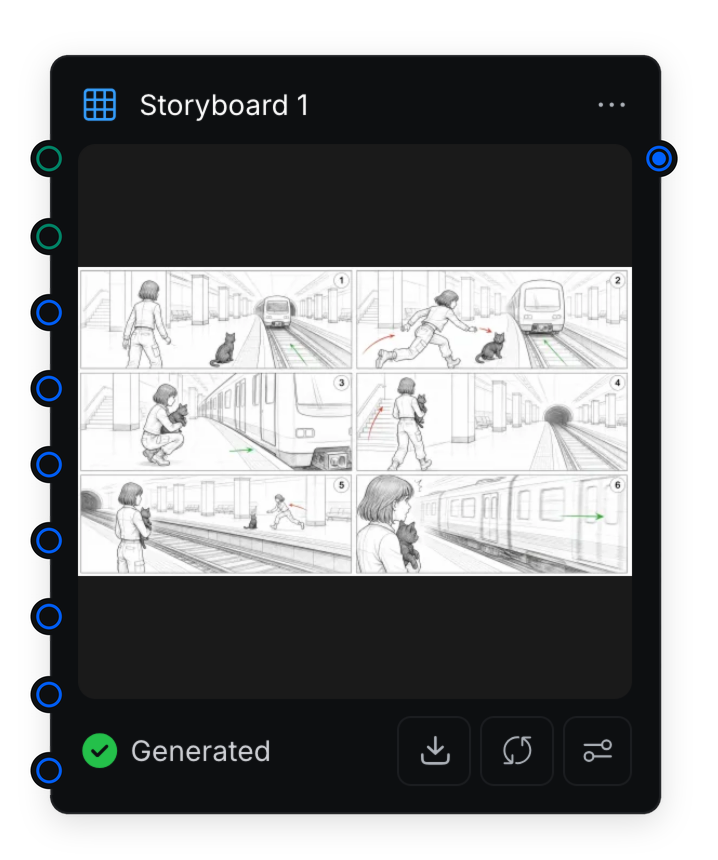
The storyboard should clearly show:
- Shot size and composition.
- Relative placement of locations and fixed landmarks.
- Human, cat, and train blocking.
- Screen direction between panels.
- Human, non-human, vehicle, and camera movement paths.
- The transition from Station A to the separate Station B.
- The repeated rescue action in the matching position.
- The absence of finished faces, clothing, fur, textures, lighting, and background artwork.